 Click on image to enlarge
Build Your Own Cabinet
This is what you really came here for, isn't it. Unfortunately this section is still under construction. Check back real soon, as now that the machine is 99% complete, updates will be coming fast!!!!
Step 1 - The groundwork:
Well, If you're going to build a cabinet, the first thing you need to do is research. Go to every site about cabinet design you can find (See the links section for help). Look at all the different designs. The first decision you'll have to make is about what type of cabinet you'll be working on. Basically you'll come up with 2 choices for your first cabinet; Buying an old arcade machine and gutting it, or building a machine from scratch. I spent a lot of time getting ignored by arcade dealers here in NY on trying to buy an old cabinet, so I built one. If you want to buy one, I'm not sure how much more help this site will be, as I never retrofitted an old machine. If you want to build a cabinet of your own; You've come to the right place.
Next you need to decide what you want your machine to be able to do. This is important for all the planning stages to follow. Ask yourself questions like these; Do I want one Joystick or two?, How many buttons for each player? Do I want a trackball,spinner, wheel or other additional peripheral?, What size monitor am I going to use?, Do I want a button "insert coin" switch or actual coin doors? (or in my case both), Do I have the room for this machine? and most importantly how much is it going to cost me? (You really don't want to get half way into the project and realize that you don't have the funds to complete it, to give you an idea, The NYLGP arcade machine, without the computer, cost over $1,000 to build. I didn't go on vacation this year to build it, are you willing to do the same? :)
I can't stress enough the need to talk with, or check the sites of other people who have built their own machines. You'll find a wealth of information there that could save your butt in the long run.
Step 2 - The Plans:
O.K., now that you know what you want to build, it's time to start planning for it. Planning can take even longer than the actual construction of the cabinet. It's here that you're going to get the first look at what you'll be building. Start simple, the first thing you need to do is order some catalogs. I'd suggest going to the sites for Happ Controls, WICO, and Hagstrom Electronics and requesting a catalog. Ordering a catalog is important, because a lot of these companies do not list all their products on the web. You may miss out on that "perfect part" if you just go by what is shown. It's also during the planning stages that you should go about acquiring whatever software you want your system to run. Want Dragon's Lair, but have the problem of running Win 95/98 and having DOS misbehave? Digital Leisure offers it in Win 95/98. Have a couple of arcade PCB's lying around? then go find the roms for those games, etc...
To start, get a pad of graph paper, some pencils and a ruler. The average arcade machine is about 6' tall and 2' Long. (not including the marquee and control panel extensions), so start from there. Look at the paper and determine a scale that will allow you to get a good sized view of the machine. (I went with 1 square - 3 inches) Now you need to determine how high you want your control board. Every body has their own methods for this, from going out and measuring their favorite arcade machine, to my method of holding your hands at a height that would feel comfortable and dropping a measuring tape. Now, using the information you just gathered, start sketching a machine. Keep working at it until you have one your happy with. Remember, this is The most important stage in the entire project, DON'T RUSH IT. Remember to leave room in your plans for any enhancements or additions you'll be going with. (Again, when building NYLGP, I kept room in the plans for the recessed marquee lighting, and speakers that are built into the marquee as well as their supports) Once you have your measurements, you'll need to create a plan for how they'll fit on the wood you'll buy. Again, start with the cabinet sides and work from there. Remember, Places like Home Depot will only cut straight lines, so if you're planning on having curves on your arcade machine, be sure to make the cut out large enough so that you can cut out the curves on your own. I found that 4' X 8' planks of wood worked the best.
Now you'll plan out your Control Panel. With another sheet of graph paper, and the measurements allowed for in your plans, draw out the shape of your board in scale. (you do not have to use the same scale as the cabinet, just make sure to keep everything in scale. Now take the measurements for the controls you plan to use from the catalogs you received or the source you got them from and start placing them. Remember to keep some space between the stick and buttons for comfort, and don't block access to any of the controls (That's why NYLGP's joysticks are at opposite ends, because the other way they blocked the trackball) Also, think of what controls you want to include on the control panel. If you're adding a trackball running as a mouse, be sure to add 3 buttons for the mouse buttons. Include frequently used controls as well.
Once you have your plans, build mock-ups. For the control panel, you can probably build a full sized mock up. I found it was very helpful to take a Drywall T Square and actually draw the grid on the wood itself. Make sure to get a feel for your button placement and check to make sure there's enough room for the stick to move in all directions without it, or your hand hitting anything. Once you've finalized a design, mark the wood you're going to use with your cutting diagram. Again, drawing the grids from your blueprints will be very helpful. Be sure to mark the center of each button and stick hole with a center point to help you guide the hole cutter. If you're using a trackball, you want to mark off where the trackball will be, how large the trackball mounting plate is, and the shape of the actual trackball assembly. (The best way to mark the trackball assembly it is to hold the actual trackball against the wood and sketch around it.) For the cabinet itself, I'd suggest building a scale model. I used Black Plastic from a folder in a paper notebook. I cut out the 4' X 8' sheets at 1 inch per foot (4" x 8") and then cut the pieces out. Using scotch tape and some patience, fit them together to get an idea of what your machine will look like and how it will fit together. Adjust your plans as necessary. Now that you've gotten all that done, it's almost time to start building your cabinet.
Step 3: Ordering Parts
By now you should have ordered parts. Make sure to order all the parts you'll need for each stage of construction. What do I mean by this? Well, you don't have to order all the parts at once. I certainly didn't, I mean, It's expensive. But make sure to order all the parts that you'll need to complete certain sections. (I held off on ordering the 19" monitor and coin doors until after the main body was built and playable). Nothing is more annoying than having to constantly run to the hardware store for supplies or wait for something to come in the mail.
Step 4: Construction
Before I start on construction, I need to say a few words about safety. When dealing with power tools you can never be too careful. Here are some steps to follow;
1.) Be sure that any time you're changing heads or blades to disconnect the power supply from the tool.
2.) Always, and I do mean always wear eye protection.
3.) Make sure your work area is secure and clean.
4.) Keep your attention on the job at hand at all times. NEVER work while there's a chance you'll be distracted.
5.) Respect Electricity - Never work on something that is still plugged in or powered.
6.) Learn how to use a tool before attempting to operate it - read all manuals fully.
7.) Don't work when tired, inebriated ill, or on medication.
8.) Use your common sense - If it feels wrong, it probably is - stop and double check what you're doing.
Remember: What good will that super complex control panel you built do you if you don't have enough fingers to operate it.
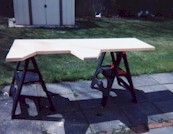
The first thing you're going to have to do is finish cutting the parts. This means any curves, holes, or adjustments you want to make. For the side of the machine, take the drywall T square and draw (as per your plans) the guidelines for your cuts onto one of the pieces of wood. Place the wood on your saw horses and, being very careful, cut along the guideline. Once you have the first side done, take it off your saw horse and place the other side on it. Place the piece that you just cut on top of it, line it up so that it matches and then secure it using clamps, tape, etc... Now using the pre-cut piece as a guideline, cut the second side out. When you're done you should have something that looks like this;
Click on image to enlarge
Click on image to enlarge
Next, it's time to cut the holes into the control panel top. Take the piece of wood you marked with your designs in the planning stage and place it securely on the saw horses. Make sure that your power drill is off, and change the blade to a hole cutter. (you'll probably have 2 - a 1 1/8" cutter for the buttons and a 1 1/4" cutter for the joystick holes) make sure the safety on the drill is on and plug it in. Placing the center drill on the guide dots you drew in the center of each button, hold the drill securely and activate it. The drill will go down into the wood, leading the hole cutter into place. After each hole is cut, check the drill (power off again) to make sure the wood cut from the cabinet is not stuck in the hole cutter. If it is, carefully remove it before cutting the next hole. Continue this process until all holes are cut. As for the trackball (if you're using one), you must remember that you are only cutting the shape of the actual trackball, not the Trackball Plate. The best way to mark it is to hold the actual trackball against the wood and sketch around it. When done you should have something that looks kind of like this...(Please note, in this picture the hole for the trackball assembly had not yet been cut.)
Click on image to enlarge 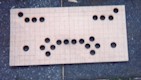 Click on image to enlarge
Now, mark off any other pieces you'll need to cut and get going. In NYLGP's case, this meant cutting the space for the coin doors, speakers, & wireless keyboard remote receiver. Here are shots of some of the other cuts I made.
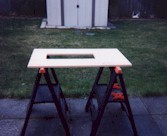
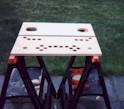
Click on the images above to enlarge
Once you've got you parts cut, It's time to start putting this bad boy together. I suggest starting from the bottom up. Make the first four pieces you put together the Base, Bottom Front (you know, where the coin door would be), and the left and right sides. (I'd suggest doing it in the following order; base-front-sides. To connect the pieces, use metal brackets. Make sure to use brackets with at least 2 holes on each side. (That's four screws per bracket). Attach the brackets to one piece, align it with another and connect the brackets. Once the pieces are aligned, use a power screwdriver to drive wood screws in and secure the pieces. When using the brackets, I'd suggest going with three on every connection at least. (left, center, right). If you're adding casters, put them on now as the machine will be getting really heavy soon, I'd suggest buying good, durable casters that can be locked in place. You will need four - one for each corner. Secure them where the base of the machine meets the sides.
Next, you'll start putting in the shelves that you want on the inside. When building the shelves, your best bet is to build the shelf first, secure it with brackets (both above and below) and then screw it into place. Don't worry about cutting holes for wires to go through just yet, as it's best to see how all your components will fit and then drill the holes. When putting the monitor shelf in, be sure to keep it even otherwise your screen will appear crooked. Unfortunately, the pictures I took during this stage of construction didn't come out. So I'll try to show it to you with a picture from a later stage;
Click on the image to enlarge 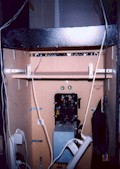 Click on the image to enlarge
Once you've got the shelves in, you'll be installing the control panel bottom. Again, use brackets to position it and then screw it into place. Continue working your way up, install the marquee bottom in the same way as outlined above. For the top of the machine, you are going to want to use two pieces of wood. The first piece should cover roughly 75-80 percent of the top. Start at the rear of the achine and line the wood up. Secure it in place with screws drive down from above (It rests on top of the machine so brackets are not necessary. Now get a piece of wood that will cover the remainig space on top of the machine and line it up with the first piece. Because you want this piece to be mobile (so you can do work inside the marquee) youll want to install a pair of hinges so that the piece may be lifted. Once again, the piece will rest on top of the frame so no additional fasteners are needed. Once again, the pictures I took during this stage did not come out, so I'll use a later picture to give you an idea of the hinges should work.
Click on the image to enlarge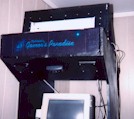 Click
on the image to enlarge
Click
on the image to enlarge
At this point your frame is pretty much built. So it's time to start work on the control panel. First, take the wood that you made your final mock up on, and secure the two side pieces and the front panel to it using a combination of brackets and screws. Be aware of how your controls will be fitting in when placing the brackets to avoid any difficulties. Once secured, it's tme to start work on the control panel top. For NYLGP, I used polyeurethane tile for the control panel top. First, DO NOT REMOVE THE PAPER FROM THE STICKY SIDE OF THE TILE YET. Measure the size of your trackball plate as well as it's position on the control panel. Place the tiles over your control panel lightly mark the dimension of the trackball plate on the tile with a black felt marker. Next, take a hobby knife out and cut the shape of the plate into the tile. Be carefull not to break or mar the tile when cutting it. Once you've got the hole for the trackball plate cut, smooth out the edges using the hobby knife, sand paper and/or a nail file. Place the trackball plate in the hole to see how it fits, and make adjustments as necessary. Remember, when doing this type of work, it's better to make the cuts too small, as you can always make them larger (unlike large holes, which can't be made smaller). Once you are happy with the fit, remove the paper from the back of each tile, place some Krazy Glue or similar adhesive on both the back of the tile and on top of the control panel, and place the tiles securely on the control panel. Do the same for the control panel front. At this point you should STOP WORK. Let the tile bond to the control panel and dry. If you don't, you're going to run into huge problems in the next step. Once dry, take a box cutter and cut a "X" (all the way through the tile) where each button/joystick is. The use the box cutter to remove most of the tile in the button hole. Then take a hobby knife and cut out the rest of the hole. Use the hobby knife,sandpaper or a file to smooth out the hole. Repeat this until all holes have been made. Now for the joysticks. Dissasemble the joystick as per the instructions if needed. Place the frame of the joystick on the underside of the panel and insert the stick and round cover on the top side of the panel. Make sure to properly align the base of the stick so that it is perfectly even. ( You get the idea, right faces right, left faces left ) (also check your instructions for which side is up).If you're using Perfect 360's you must also remember that the connectors should face right. ( Take your time on this, because if you are off center, the joystick wont really function properly. Now, using a small drill bit, drill guide holes from underneath where the four attachment screws will be placed. Then from above, use a drill bit the actual size of your bolts to drill the holes. Place the bolts through the holes (and through the joystick) and secure on the other side with a washer and nut. Tighten the nut a little (just enough so the joystick doesn't wobble) and repeat for all other joysticks. For the buttons you will place the button in the hole from the top of the panel and tighten it from below with the plastic holder. It's best to align all the buttons the same way underneath, as it will make wiring much easier. Place the trackball plate on the top side of the control panel. Line the trackball up with the plate from underneath the panel and secure in place using four bolts. Use a small drill bit to drill holes in the securing holes for the plate. Then put four bolts through the holes and secure the trackball assembly. Look, it's a control panel!!! Now it's time to wire it. Once again, the pics taken at this point during construction did not come out, so here's a look at the final product.
Click in the image to enlarge Click
on the image to enlarge
Click
on the image to enlarge
Step 5: Wiring
This is the part that no one really tells you about. How to wire your control panel. There are so many different ways to do it, that I could spend years telling you how to do it. Instead, I'm just going to tell you the 2 methods I used for NYLGP. I used both a Happ Controls USB Fighting Interface and a Hagstrom LP24 keyboard encoder. Both are pretty simple hook ups. (If you read the instructions.) The USB Fighting Interface was used for the 2 Joysticks and 12 related buttons & the trackball and it's three buttons, The encoder was used for the coin doors, coin buttons, player start buttons and the three function buttons.
Wiring the USB "Fighting" Interface
The USB Interface is a relatively easy hook up, so long as you fully read the directions first. Let's start with the easiest part, wiring the trackball to the interface. If you went with an actual arcade trackball, it doesn't get any easier than this. Plug the bundled 6 prong cord on the trackball to the matching connector on the interface. Ta Daaa! the trackball is hooked up. Next up, it's time to wire your joysticks to the interface. Before you start, I suggest attaching quick disconnects to the end of the joystick and button wires. (Just strip the end of the wire, attach the quick disconnect and crimp the connection closed). This will allow you to make adjustments relatively quickly and insures a solid electrical connection. For NYLGP I used Happ Perfect 360 joysticks, which are a little different from other joysticks. First, let me say I LOVE the perfect 360's when compared to microswitch joysticks. They don't suffer from that horrible clicking noise and are extremely responsive. I'll cover both hook ups here.
Hooking up Happ Perfect 360's to the USB Interface
This is another easy connection process. In your USB manual, there is a list of what each connector is and what the wires connected to it are for. There are 6 connectors on each joystick, four directionals, a +5v power line, and a ground. First off, the USB Fighting interface recognizes Joystick 2 as the primary joystick for most games. (Why I don't know, but it just seems to work that way) So when wiring, remember that your main joystick will be J2. Find the connectors marked J2U (Joystick 2 Up) and attach it to the corresponding connector on the Perfect 360. Next do the same for the other 3 directionals. (If at this point you're saying, but what about 8 way operation, the joystick recognizes a Up and Left move as a connection of both Up and Left) Now attach the J2 +5v Line to the +5 connector on the joystick, and finally connect a quick disconnect to one of the ground wires and connect it to the G terminal on the joystick. Now you have your first joystick hooked up. If you're going with a second stick (Highly recommended even on a one player set up) repeat the above instructions for joystick one.
Wiring buttons to a USB Fighting Interface
Again, I suggest connecting quick disconnects to the end of each wire. When wiring a control button you will connect 2 wires to each button, the actual wire that runs to the specified control and a wire that runs to a ground. Both are needed for proper button operation. Here's a look at how to hook it up;
When wiring the buttons make sure the ground wire does not touch the terminal next to it, or else the button will act as if it is being pressed and held down. You can use the same ground wire for multiple buttons by stripping the wire and running it through multiple ground terminals.
Testing the USB Interface
To test the Interface, make sure you have first followed the installation instructions with regard to drivers as outlined in the USB instruction manual. Once this is complete, go to the Game Controllers icon in your Win 95/98 control panel and select the appropriate Joysticks. The test functions will allow you to check if the joystick is calibrated and functioning and if the buttons are registering keypresses. Be sure to check both the individual buttons as well as the joysticks. Make adjustments as necessary to the wiring. One word of caution, never work on the wiring with the system running, you could get shocked or do some damage to your PC. Once you have all the buttons and sticks working, secure the quick disconnects to the connectors using electric tape or solder.
Attaching the Control Panel
Now that your keyboard is wired, it's time to connect it to the frame of your arcade machine. If you measured everything out just right, the control panel should fit into it's slot snuggly enough to not require any locks or hooks. If it doesn't you'll have to devise some way to attach the board while still giving yourself the ability to get under the control panel to make adjustments and repairs. My original design had a hinged bottom plate that was held on by a series od 12 wing nuts. (The hing opened towards the bottom of the panel, so that it would only swing when the panel was removed from the frame, allowing me to access all the components.